ZGR-1 is a product designed to control a Nikon DSLR Camera through an iPhone/iPod Touch/iPad portable device. It provides GPS functions to send GPS information (Longitude, Latitude, Altitude, and UTC Time) from Apple devices to Nikon DSLR cameras. With a built-in interval timer, it will help you to control exposure time, interval time, and delay time. ZGR also provides a remote shutter release function, auto-focus function and a lock function for when your camera is in bulb mode.
Be sure to read this manual thoroughly before use.
In the following manual, the iPhone/iPad/iPodTouch will be referred to as the DEVICE, and the ZGR-1 as the ACCESSORY.
Supported Models
There are two types of ACCESSORY, ZGR-1a and ZGR-1b.
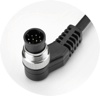
ZGR-1a, This ACCESSORY has a round connector with 10 pins.
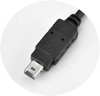
ZGR-1b, This ACCESSORY has a square socket with two rows of connectors in it.
| Product | Supported Models |
|---|---|
| ZGR-1a | Nikon D4, D3S, D3X, D3, D800, D800E, D700, D300, D300S, D2X, D2XS, D2HS, D200 |
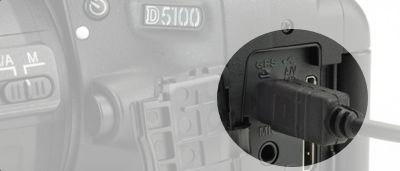
| ZGR-1b | Nikon D7000, D5100, D5000, D90, D3200, D3100, D600, D5200 |
Supported iOS device
- iPhone 3GS, 4, 4S, 5*
- iPod Touch 3rd, 4th, 5th*
- iPad 1, 2, 3, 4*, mini*
Requires iOS version 5.0 or later
* iPhone 5/5s/5c, iPod Touch 5, iPad 4 and mini requires Lightning to 30-pin Adapter
Connecting ZGR-1
Step 1
Turn the camera off
Step 2
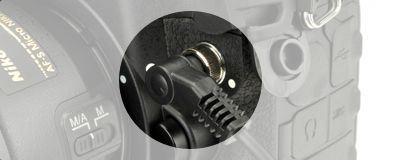
For ZGR-1a, as shown in the following, align the tip of the connector socket with the corresponding port on the camera body, insert the ten-pin connector into the camera’s ten-pin remote terminal and tighten the locking nut.
For ZGR-1b, as shown in the following picture, insert the square socket into corresponding port on the camera body. Be sure the connector is correctly oriented; do not use excessive force
Step 3
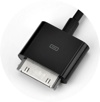
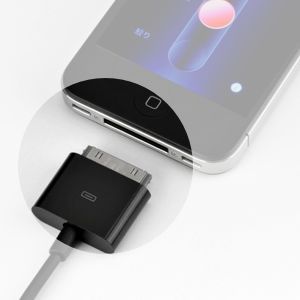
Insert the 30-pin connector into the DEVICE 30-pin terminal
Step 4
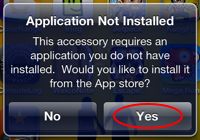
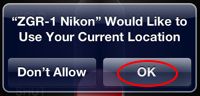
If the software application has not been installed in the DEVICE, a dialog box will pop up, as shown in the following picture. Lightly tap YES to install the ZGR-1 Application
If the application has been installed, a dialog box will pop up as shown in the following picture. Select [Allow] to start up it.
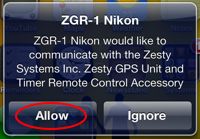
Allow the application to use your current location information.
Step 5
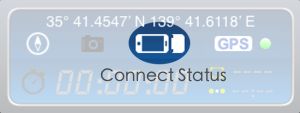
Confirm the connection status. If the ACCESSORY has been connected correctly, the icon, as shown in the following picture, will stop flashing in 5 seconds. If it keeps flashing, remove the ACCESSORY and reconnect it
Step 6
Turn the camera on
Demo video

App Manual
This application supports Automatic Timer Mode and Manual Mode.
The Automatic Timer Mode includes exposure time, interval time and delay time set up functions.
Manual mode provides remote shutter release function.
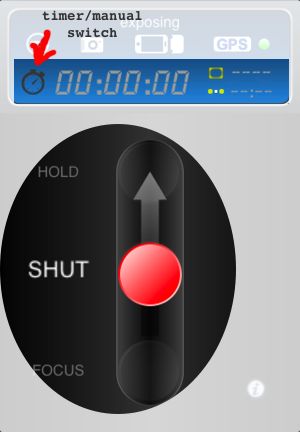
Use manual mode
switch timer/manual into manual mode, adjust the focus mode of camera lens.
| Focus Mode | Auto Focus or Manual |
push red button or iPhone's volume button or volume button of earphone to control focus, shut and hold status.
after pushing the button to the hold state to start shooting, the connector on DEVICE side can be removed from DEVICE (do not remove the connector on camera side). it will keep working till task finished.
Demo video
Use automatic timer mode
Step 1
For using long-time exposure time function, Nikon DSLR camera MUST to be set as following
| Exposure Mode | M(Manual) |
| Shutter Speed | BULB |
For using internal time function, Nikon DSLR camera MUST to be set as following.
| Interval Timer | OFF |
Certainly, both functions above can be used simultaneously.
Step 2
Touch the icon shown as following, to enable exposure time set function.
Step 3
Set exposure time.
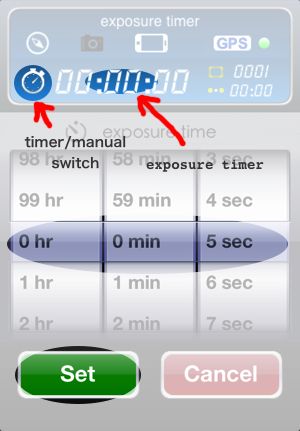
When exposure time is set to 00:00:00, camera shutter speed is controlled by camera itself
Step 4
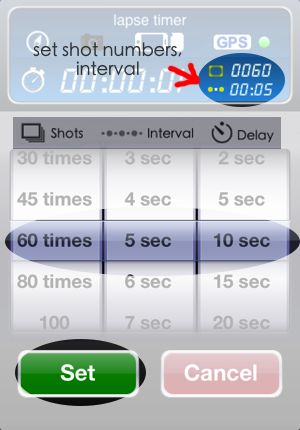
Set the number of shoot, interval time and delay time as following.
Step 5
after pushing the button to the hold state to start shooting, the connector on DEVICE side can be removed from DEVICE (do not remove the connector on camera side). it will keep working till task finished.
Features:
Exposure time: 0s to 99hrs 59min 59s in one-second increments
Interval: 1s to 90min in some second increments
Delay start: 0s to 90min in some second increments
Number of shoot: 1 to 6000
Focus:
Adjust the Focus Mode of camera to Auto Focus, then press focus button in app.
Manaual Mode
Take photographs manually using the shutter-release button as the remote cord.
Volume Control
Push Volume(+/-) button, "+" is push up, "-" is push down of red button.
Demo video
Recording GPS Data
Step 1
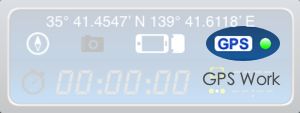
When the GPS icon turns green, GPS data is sending to camera.
When the GPS icon turns red
 ,
GPS does not work correctly or GPS function is disabled.Open
[Settings],open [Location Services] and enable [ZGR-1 Nikon]
application.
,
GPS does not work correctly or GPS function is disabled.Open
[Settings],open [Location Services] and enable [ZGR-1 Nikon]
application.
When the GPS icon turns gray ,GPS transfer function is disabled by application. Click
GPS icon to enable GPS transfer function.
,GPS transfer function is disabled by application. Click
GPS icon to enable GPS transfer function.
Yellow is showing it is working for GPS data, please wait or check GPS settings of your iPhone.
Step 2
A GPS icon will be displayed in the control panel on top of the camera.
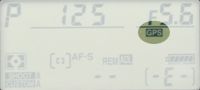
Step 3
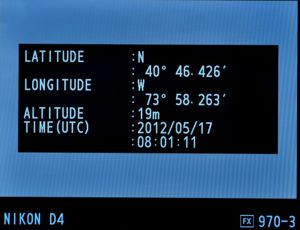
To view GPS data, select GPS > Position in the camera setup menu (this option is not available with D2X, D2XS, D2HS, and D200 cameras). The current latitude, longitude, altitude, and Coordinated Universal Time (UTC) will be displayed as following.

Step 4
Take pictures. GPS data will be saved in each photograph
Step 5
GPS data can be viewed in the photograph, shown as following.
Use GPS Function free
About accurate of GPS information
Since ACCESSORY obtains GPS and map infromation on DEVICE, the accurate is same as DEVICE.
DEVICE use A-GPS("Assisted GPS") which in basic terms accesses an intermediary server when it is not possible to connect directly via satellite -- indoors, for example -- and this server provides the nearest satellite with additional information to make it possible to more accurately determine a users position.
DEVICE also use "wi-fi hotspots and cellular towers to get the most accurate location fast" when GPS is not the most convenient method of location detection. When DEVICE works at someplace such as ocean, mountain, or underground, it can't provide accurate GPS information by above reasons, in this case, you can get a more accurate position by adjusting GPS position manually.
Adjust GPS coordinates manually
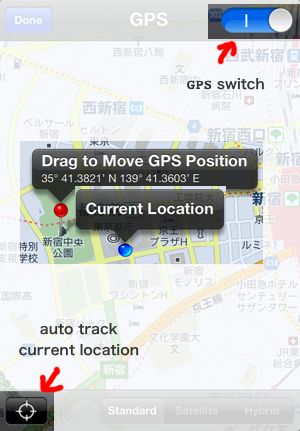
Press
 for settings of GPS. use the top-right switch to enable/disable
GPS function. the blue point shows current location, and
red pin shows GPS position. In default, the red pin tracks
current location. You can move it to a new location for
your photographs.
for settings of GPS. use the top-right switch to enable/disable
GPS function. the blue point shows current location, and
red pin shows GPS position. In default, the red pin tracks
current location. You can move it to a new location for
your photographs.
Demo video